Monday, February 27, 2012

Chicken, Bacon and Avocado Quesadillas


I love quesadillas. They are so versatile, easy to whip up, and tasty! When I saw this version that included bacon and avocado, I knew I had to try it. I am always so impressed when relatively few ingredients combine to make an outstanding meal!

Start by cooking the bacon. I find it easiest to dice up the bacon first, then cook it over medium heat until crispy. Remove the bacon to a paper-towel lined plate, and drain off the grease, leaving just a tablespoon of drippings in the pan.

Return the heat to medium, and add the green onions to the skillet.


Cook for a few minutes until they soften, then add the chicken.


Season the chicken with salt and pepper, then saute til golden and cooked through, about 5 minutes. Remove the chicken to a plate, and rinse or wipe out the skillet. (Or, use a different pan to cook the quesadillas - that's what I did!)

Now, in the clean skillet over medium heat, melt 1/2 Tbsp. butter. Add one tortilla, and sprinkle the cheese on the front half of the tortilla. Add 1/4 of the chicken


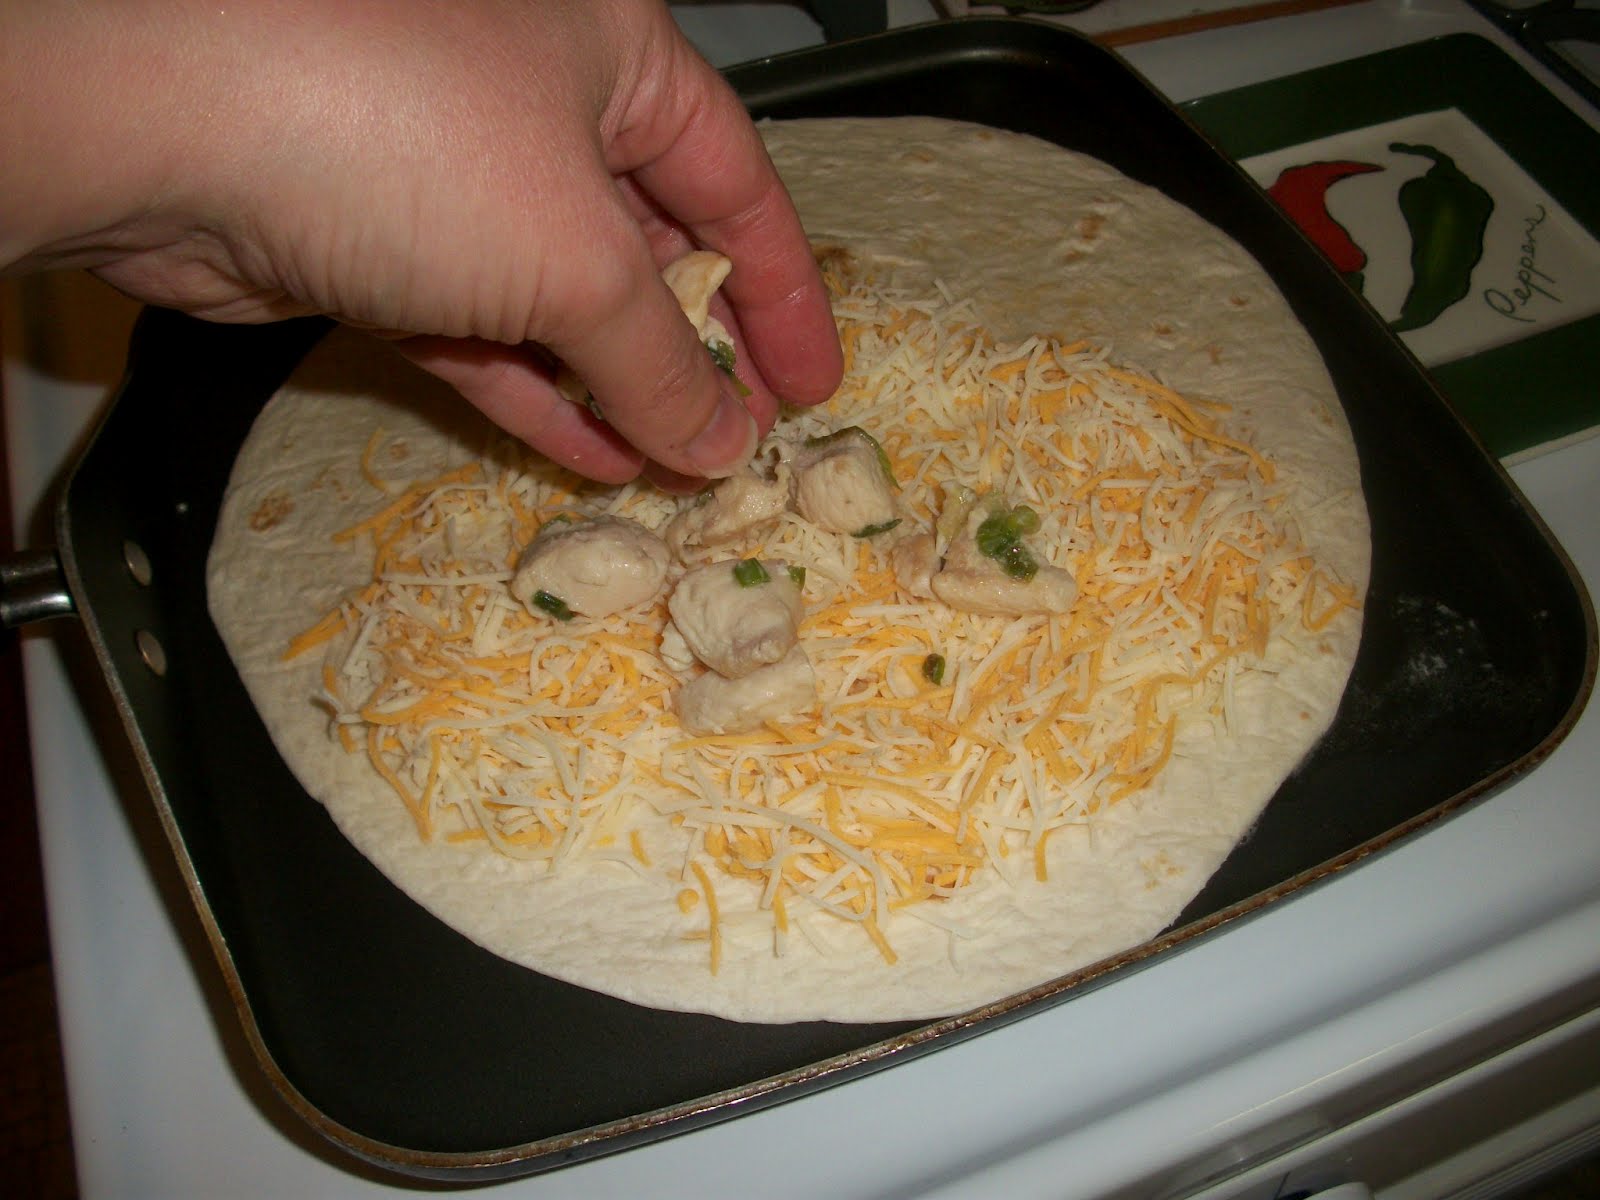
then the bacon, and the avocado.


Carefully fold the top half of the tortilla over the filling


and press down gently to get it to adhere a bit. Let it cook for about 1 or 2 minutes, until the underside is golden and the cheese is melted. Then carefully flip it over and cook on the other side for 1-2 minutes. Repeat with the remaining tortillas and filling.

I find it easiest to use a pizza cutter to cut these into thirds. Serve with plenty of salsa for dipping!

One year ago: Greek Salad
Two years ago: Hummus

Find more great ideas at Mouthwatering Monday, Mangia Mondays, Menu Mondays, Your Recipe, My Kitchen, Mop it up Mondays, Tasty Tuesday, Tasty Tuesday (#2), Tuesday at the Table, Totally Tasty Tuesdays, Tasty Tuesday (#3), Made from Scratch Tuesday, A Little Birdie Told Me, Kidz in the Kitchen, Tuesday Talent Show, Cast Party Wednesday, What's Cooking Wednesday, These Chicks Cooked, Recipe Roundup, Famous Linkz Party, Bacon Fest.

Chicken, Bacon and Avocado Quesadillas

4 burrito-sized flour tortilla shells
1 lb chicken, cut into bite-sized pieces
1/2 cup sliced green onions
8 strips of bacon, diced
1 avocado, diced
1 1/2 cups Mexican blend shredded cheese
2 tbsp butter

Cook the bacon in a skillet over medium heat until crispy. Remove to a paper-towel lined plate. Remove all the drippings except for 1/2 tablespoon. Reheat the skillet over medium heat, then add the scallions and saute about 2-3 minutes until softened. Add the chicken, season with salt and pepper, and cook for about 5 minutes or until chicken is golden and cooked through. Remove the chicken and scallions to a plate and rinse out the skillet.

Add about 1/2 Tbsp. butter to the skillet over medium heat. When foamy, add a tortilla and swirl it around to get it nice and buttery. Layer one side of the tortilla with cheese, chicken, bacon and avocado. Gently flip the other half of the tortilla over and press down. Cook the tortilla for about 1-2 mins on each side or until golden brown and crispy.

Recipe Source: Kevin and Amanda

Thursday, February 23, 2012

Corn Casserole


This very easy side dish is a wonderful addition to a roast beef or turkey dinner. It is a snap to throw together, and makes "regular" corn a little more dressed up. Try it for your next Sunday dinner.

In a large mixing bowl, combine the corn, cream corn, Jiffy mix


and yogurt. Add the melted butter


and stir to combine. Add the cheese


and stir well. Spread into a greased casserole dish


and bake at 350 for 50-55 minutes. Let stand for 5 minutes before you serve it.


One year ago: Chicken Noodle Casserole
Two years ago: Fried Cauliflower

Find more inspiration at Bake with Bizzy, It's a Keeper, Full Plate Thursday, Friday Food, Food on Fridays, Foodie Friday, Fusion Fridays.

Corn Casserole

1 can whole kernel corn, drained
1 can cream-style corn
1 package Jiffy corn muffin mix
1 cup plain Greek yogurt
1/2 cup butter, melted
1 cup shredded Cheddar cheese

Mix together the corn, Jiffy, sour cream and butter in a large bowl. Stir in the cheese. Pour into a greased 9x13 baking dish or large casserole dish.

Bake at 350 for 55 minutes, or until golden brown and set. Let stand 5 minutes before serving.

Recipe source: Adapted from Paula Deen

Monday, February 20, 2012

Chocolate Mousse Cake with Raspberry Sauce


It's time for Reveal Day again at the Secret Recipe Club! I had so much fun perusing Liz's blog (and I love her title: That Skinny Chick Can Bake!); as usual, it was hard to choose just one recipe. But I was baking for a special occasion, and this cake rose quickly to the top of my list. This Chocolate Mousse Cake is certainly celebration-worthy, with TONS of chocolate surrounded by lady fingers and whipped cream. It's actually even more delicious than it is beautiful. I was glad I had made chocolate chip cookies for the kids at the party so the adults could enjoy more of this delicious cake!

I made one change to Liz's recipe: I added a raspberry sauce. This was partly done out of necessity - Liz's recipe calls for soft ladyfingers, and I used Italian ones *(like you use for tiramisu). Because of this, I needed the cookies to soften more, so I added a raspberry sauce on the top and the bottom. It was more than just functional though - the red sauce added a dimension to the dessert that was fantastic - both in color and taste. Raspberries are a wonderful compliment to chocolate and everyone enjoyed the fruity addition.

Start by chopping all the chocolate and combining it in a saucepan, or microwave safe dish, with the water.


Melt the chocolate over low heat on the stove top, stirring constantly, or in the microwave at reduced power, stirring every 30 seconds. The mixture will be extremely thick. Then add the powdered sugar


vanilla and egg yolks


and stir vigorously until well combined. (Making this cake is good exercise! This will give your arm a work out!)


Set the mixture aside to cool. In the meantime, line a loaf pan with foil, and lightly spray it with nonstick cooking spray. Layer ladyfingers in the bottom of the pan, cutting them if necessary to fit.


Now beat the egg whites until soft peaks form. Fold some of the egg whites into the chocolate mixture,


then fold in the remaining until totally incorporated. Pour half of the chocolate mixture over the ladyfingers.


Continue with a second layer of ladyfingers, the remaining chocolate, and a final layer of ladyfingers.


Cover with saran wrap or more foil, and refrigerate for at least 6 hours, but preferably overnight.

To make the raspberry sauce, combine the raspberries, sugar and water in a small saucepan and cook over medium-low heat until raspberries are thawed. Stir often to sort of break up the raspberries. Combine the cornstarch and water in a jar and shake until dissolved, then add to the raspberry mixture. Continue to cook and stir until slightly thickened. Let cool completely.

To assemble the cake, carefully spoon half of the raspberry sauce onto the serving platter.


Lift the cake (in the foil) out of the loaf pan using the foil edges.


Invert the cake onto the platter and carefully peel back the foil.


Spoon the remaining raspberry sauce over the top of the cake. You want the sauce to soak into the top layer of ladyfingers, not run all over, so try to contain it as best you can!


Return to the fridge for several hours.

When ready to serve, pour the whipping cream into a small mixing bowl, and add the vanilla and powdered sugar.


Whip the cream, then frost the cake top


and sides,


being careful not to swirl too much of the raspberry or chocolate.


To garnish, I grated chocolate over the top, then added some whole raspberries.


This cake is very rich - be sure to serve with coffee (or tall glasses of milk) and enjoy!


Thanks, Liz, for a great celebration cake!

One year ago: Pumpkin Bran Muffins
Two years ago: Peanut Butter Cup Cheesecake

For more great recipes, visit Mangia Mondays, Mouthwatering Mondays, Your Recipe, My Kitchen, Mop it Up Monday, Menu Monday, Tasty Tuesday, Tempt my Tummy Tuesday, Tasty Tuesday (#2), Made from Scratch Tuesday, Totally Tasty Tuesday, Tasty Tuesday (#3), A Little Birdie Told Me, Crazy Sweet Tuesday, Cast Party Wednesday, What's Cooking Wednesday, These Chicks Cooked, Sweet Treats Thursday, Sweet Tooth Friday, This Week's Cravings.

Chocolate Mousse Cake with Raspberry Sauce

2 - 3 oz. packages of soft ladyfingers
(alternatively, use Italian ladyfingers - about 24)
18 ounces semisweet chocolate, chopped
3 Tbsp. water
1/4 cup powdered sugar
7 egg yolks
5 egg whites
1 1/2 teaspoons vanilla

8 oz. frozen raspberries
1/3 cup sugar
2 Tbsp. water
1 Tbsp. cornstarch
2 Tbsp. water

1 cup heavy cream
1/4 cup powdered sugar
1 tsp. vanilla
Raspberries or chocolate curls or shavings to garnish

Line a loaf pan with parchment paper or foil. Split the ladyfingers in half and arrange on the bottom the pan. Trim ladyfingers to fill any empty spots. Set aside.

Melt chocolate with 3 tablespoons of water in microwave. Start, stop and stir at 30 second intervals till chocolate is melted and smooth. (To melt on stovetop, stir constantly over low heat.) Mixture will be thick. Stir in powdered sugar, egg yolks and vanilla. Beat till smooth. Allow to cool.

Beat the egg whites till soft peaks form. Mix some of the whipped egg whites into chocolate mixture, then fold and mix in the rest till completely combined. Spread half of this chocolate mousse over the ladyfingers, then place a second layer of ladyfingers over the mousse. Top with the remaining mousse and then another layer of ladyfingers. Cover with foil or plastic wrap. Chill at least 6 hours or overnight.

For the raspberry sauce, combine frozen berries, sugar and 2 Tbsp. water in a small saucepan. Cook and stir over medium-low heat until berries thaw, stirring often to break up the berries. Combine the cornstarch with the remaining 2 Tbsp. water and shake til dissolved; add to the raspberries and cook and stir until slightly thickened. Let cool completely.

Spread half of raspberry sauce on serving platter. Lift cake in foil out of pan and invert over raspberry sauce. Carefully peel back foil, then spoon remaining raspberry sauce over the top of the ladyfingers. Return to refrigerator for several hours.

When ready to serve, whip cream with powdered sugar and vanilla. Frost cake with whipped cream and garnish with raspberries or chocolate curls or shavings. Serves 12.


Wednesday, February 15, 2012

Creamy Shrimp Linguine


This is a quick weeknight dinner combining some of my favorite things: shrimp, veggies, pasta and a creamy sauce. It doesn't even take much longer than the time to cook the pasta, meaning you can have a delicious homemade dinner faster than cooking a frozen pizza or going through the drive thru!

Cream cheese provides the base for the sauce, which gives it a rich flavor and is a nice compliment to the crunchy vegetables. (Use whatever vegetables you have on hand, or whatever is your favorite! This recipe is highly adaptable.) Doctored up with some herbs and plenty of garlic, the delicious sauce ties all the elements together nicely.

Put the water on to boil for the pasta, then toast the pine nuts in a dry skillet. Just heat a skillet over medium high, add the pine nuts, and stir or toss them often until they are fragrant and golden. I just love the smell of toasting pine nuts!

Next, assemble the vegetables. Slice the red pepper, halve the snow peas, and chop the mushrooms.


When the pasta water boils, add the linguine, and cook for 8 minutes. Meanwhile, heat the olive oil in a large skillet over medium-high heat, then add the snow peas, red pepper and garlic, and stir fry for about 2 minutes.


Add the mushrooms, and cook for an additional 2 minutes.


Now add the cream cheese (I like to cut it into a few chunks first) and reduce the heat to medium-low. Stir constantly until the cheese is almost melted.


Add in the basil, salt and pepper, and the wine and chicken broth.

The 8 minutes are probably up on the pasta, so add the shrimp to the pasta and water, and cook for 2 more minutes.

Stir the sauce well so all the ingredients are incorporated, then drain the pasta and shrimp and add it to the sauce.


Stir to coat all the pasta and shrimp, then add the parmesan cheese and stir again.


Serve the pasta on individual plates or in bowls, and garnish with the toasted pine nuts.

One year ago: Strawberry Coffee Cake
Two years ago: Cranberry Orange Cake

Get more ideas at Cast Party Wednesday, What's Cooking Wednesday, These Chicks Cooked, Hearth and Soul, It's a Keeper, Full Plate Thursday, Foodie Friday, Fusion Fridays, Food on Fridays, Friday Food, Recipe Roundup.


Creamy Shrimp Linguine


6-8 ounces linguine
1/2 pound cooked medium shrimp
1 Tbsp. olive oil
2 cups snow peas, halved
1/2 large red bell pepper, thinly sliced
1 cup chopped fresh mushrooms
2 cloves garlic, chopped or minced
1/2 teaspoon salt
4 oz. reduced fat cream cheese
1/2 tsp. dried basil
freshly ground pepper, to taste
1/4 cup chicken broth
1/4 cup white wine (or additional chicken broth)
1/4 cup grated fresh parmesan cheese
2 tablespoons toasted pine nuts

Put a large pot of water on to boil; when ready, add pasta and cook for 8 minutes. Add shrimp and cook for an additional 2 minutes. Remove from heat and drain.

Meanwhile, heat olive oil in a large skillet over medium high heat. Add peppers, snow peas and garlic and stir fry for 2 minutes. Add mushrooms and cook for another 2 minutes, stirring often. Reduce heat to medium low and add cream cheese, basil, salt and pepper. Stir until cream cheese is melted, then add wine and chicken broth. Stir until well combined and all vegetables are coated.

Add linguine and shrimp to the sauce and vegetables in skillet and stir to coat everything. Adjust seasonings to taste; sprinkle with parmesan and stir until it's incorporated. Sprinkle with pine nuts and serve. Serves 4.

Monday, February 13, 2012

Jelly Thumbprints


These cookies are traditionally made at Christmastime, but filled with red jelly, they make a perfect cookie for Valentine's Day.

Start by combining the brown sugar, shortening, butter, vanilla and egg yolk.


Beat this until combined, then stir in flour and salt until the dough holds together.


Shape the dough into 1-inch balls, then dip each ball into the egg white. (Little helpers will love this messy step!)


Now roll each dough ball into the chopped nuts.


Now place the dough balls about 1 inch apart on an ungreased cookie sheet. Use your thumb (these are thumbprints after all!) to make an indentation in each dough ball.


Now spoon a bit of your favorite jelly into the indentation of each cookie.


Bake for 10-12 minutes or until golden. Cool completely on a wire rack. In the meantime, combine the powdered sugar and milk to make a glaze. When the cookies are cool, lightly drizzle the glaze over each cookie,


and then allow to dry until glaze is set.

Serve up these delicious cookies to your Valentine, and feel the love...

Find more great ideas at Mouthwatering Mondays, Mangia Mondays, Your Recipe, My Kitchen, Mop it Up Monday, This Week's Cravings, Tasty Tuesday, Tuesday at the Table, Tasty Tuesday (#2), Tempt my Tummy Tuesday, Made from Scratch Tuesday, Totally Tasty Tuesdays, Tasty Tuesday (#3), A Little Birdie Told Me, Crazy Sweet Tuesdays, Cast Party Wednesday, Sweet Treats Thursday.

Jelly Thumbprints

1/4 cup brown sugar
1/4 cup shortening
1/4 cup butter, softened
1/2 tsp. vanilla
1 egg, separated
1 cup flour
1/4 tsp. salt
3/4 cup finely chopped nuts
about 1/4 cup your favorite jelly

1/4 cup powdered sugar
1/2 to 1 tsp. milk

Mix brown sugar, shortening, butter, vanilla and egg yolk in medium bowl. Stir in flour and salt until dough holds together.

Shape dough into 1-inch balls. Beat egg white slightly. Dip each ball into egg white. Roll in nuts. Place about 1 inch apart on ungreased cookie sheet. Press thumb deeply in center of each. Fill each center with a dollop of jelly.

Bake at 350 about 10-12 minutes or until light brown. Immediately remove from cookie sheet to wire rack. Cool completely, about 30 minutes.

Combine powdered sugar and milk and whisk until smooth. Drizzle glaze over cookies and let dry until set.

Thursday, February 9, 2012

Peanut Butter Bread


I love peanut butter on bread. It is one of my most frequent breakfasts and also a quick snack or supper fall back. So you can imagine my glee when I found this recipe for peanut butter bread! It is absolutely delicious with jam, and wonderful on its own, too. Reminiscent of a peanut butter cookie, but less likely to induce guilt when eating it for breakfast, this bread should make an appearance at your house, and soon!

Start by combining the flour, baking powder and salt in a small bowl,


then set aside. In a large mixing bowl, cream together the butter, sugar and brown sugar


until combined. Add the peanut butter


and mix it in, then add in the egg and vanilla. Slowly add the flour mixture, and mix until well combined, scraping down the sides of the bowl to incorporate everything. It will be very crumbly!

Now gradually add the milk, beating on low as you pour it in.


Beat until the batter is smooth, then spread it into a greased 9-inch loaf pan.


Bake for about 45-50 minutes until the top springs back when touched. Cool in the pan for 15 minutes, then remove to a wire rack to cool completely. Enjoy plain, or with your favorite jam!


Find more great ideas at It's A Keeper, Full Plate Thursday, Bake with Bizzy, Sweet Treats Thursday, Sweet Tooth Friday, Foodie Friday, Fusion Friday, Food on Fridays, Friday Food.

Peanut Butter Bread

2 cups flour
1 Tbsp. baking powder
1/2 tsp. salt
1/4 cup butter, softened
1/2 cup sugar
1/4 cup brown sugar
1 cup creamy peanut butter
1 egg
1 tsp. vanilla extract
1 cup milk

In a small bowl whisk together the flour, baking powder, and salt.

In a separate large mixing bowl beat the butter, sugar and brown sugar until combined. Mix in peanut butter. Mix in egg and vanilla, and scrape down the sides of the bowl. Add the flour mixture and beat on low until combined. (The batter will be very thick and crumbly.) Pour in the milk and beat on low until the batter is smooth.

Spoon batter into a greased 9-inch loaf pan and evenly spread it out. Bake at 350 for 50 minutes or until the center springs back when pressed with a fingertip. Cool in pan on a wire rack 15 minutes, then remove from the pan and cool completely. Makes 12 slices.

Recipe Source: Cinnamon Girl Recipes
Powered by Blogger.